How to carve a Halloween pumpkin
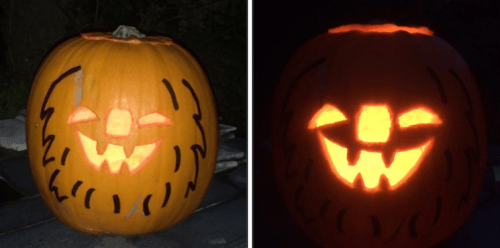
The friendly monster stencil was inspired by Rex London’s Monsters of the World range
Got your Halloween pumpkin but need some tips on what to do with it? Let us help you make a truly ghoulish gourd this year. Just follow our guide to help you create the most spooktastic pumpkin lanterns on the block.
Pick a pumpkin
First things first, you have to choose a good pumpkin. Pick one that's the right size for your plans: large pumpkins are best for elaborate designs, whereas mini ones will be perfect for your children to try their hands at carving.
Try to find a pumpkin that doesn't have any nicks or bruises so you'll have a smooth surface to work with, and choose one that's ripe for carving. To find out whether it's ready, just give it a tap - if it sounds hollow then it's ready to go.
Although it might be tempting to buy a pumpkin early, try to resist. Pumpkins will start to rot a week or so after you have carved them, so make sure your timing is right for them to be at their best on Halloween night. Nobody wants a saggy pumpkin!
Monster Pumpkin

Click here to download a printable version of the monster stencil
Image: Monsters Of The World Photo Booth Props
Younger children will love this cheeky monster stencil. Print out the template and stick it to the front of your prepared pumpkin. Older children can then prick out the design with a pin or nail. Then you can cut out the monster features for them (see guide at the end).
For little ones, cut out the shaded areas of your stencil before you stick it on. Let them colour in the eye and mouth holes with marker pen straight onto the pumpkin.
Our friendly monster stencil is based on our Monsters of the World design. Check out the full range to see what other monster stuff is available for your Halloween party.
Rex London’s top tips for carving the perfect pumpkin
Step 1: Choose a healthy pumpkin with no cuts or bruises – it will last a whole lot longer. Be sure to work on newspaper. It’s gonna get messy!
Step 2: Use a serrated knife to the top off your pumpkin. Angle the knife so that the ‘lid’ slots back on top, rather than just falling through the hole.
Step 3: Put your hands inside and pull out the seeds and stringy bits. This deliciously gooey stage is definitely a job for the kids! Reserve the seeds – you can toast them or put them out for the birds.
Step 4: Now scoop out the flesh with a spoon, applying pressure as you work around the inside of your pumpkin. Put all that pumpkin flesh to the side to make something yummy with. Stop when you reach a thickness of about half an inch.
Step 5: Print out your chosen stencil and tape it to your pumpkin.
Step 6: Kids can use a blunt pencil or nail to prick out the design. Older kids and adults may prefer to use a pin.
Step 7: Remove your stencil and use a small serrated knife (or better still a pumpkin carving kit) to carefully hollow out all the shaded areas of your stencil.
Step 8: You know best if your tweens and teens will be safe carving a pumpkin under your supervision. But if your kids aren’t old enough to wield the knife themselves, appease them with drawing the outline of the monster’s face with a black marker. We pricked out the design on the template so it was a bit like a join-the-dots puzzle!
Step 9: Rub vaseline into the fleshy bits of your carving to stop it discolouring.

Step 10: Put a tea-light or battery-powered lights inside to make your pumpkin glow.
We’d love to see your petrifying pumpkins! Please share your creations with us on our Facebook page. Happy Halloween!


